Want to learn how to grow weed? Look no further…
You will have to decide whether you are growing weed indoors or outdoors, pick the grow lights, grow medium, the seeds and the nutrients.
Then you germinate the seeds and take care of them through the vegetative state and the flowering state.
Finally, you harvest, dry and cure the buds. Your bud is ready to be smoked!
I decided to join the bandwagon, but like with everything else I do, I took a systematic approach so that I could get it right and grow the best weed possible!
I know that growing your own weed might seem complicated. But believe me, it’s simpler than it looks – you just have to take it one step at a time.
In this article, I will break it down for you and show you how you can grow your own weed taking into consideration different grow space sizes, your budget, and your desired yield.
How To Grow Weed – Brief Overview
Let’s start by looking at what a cannabis plant needs to thrive?
Like any other plant, your weed needs light – direct sunlight or artificial grow lights, the grow medium – soil isn’t your only option, a well-ventilated space with good air exchange and a slight breeze, the right temperature, nutrients – which you can buy or compost on your own, and finally of course – water!
Whether you are growing weed indoors or outdoors, you will need to ensure that it gets the proper amount of all 6 resources.
And if you’re wondering how long it will take from planting the seeds to harvesting your cannabis using this technique, the answer is about 9 weeks, give or take – if you’re going with a quick-finishing auto-flowering strain.
One must note that growing indoors means more control and therefore, shorter time to harvest. But with shorter grows, you also tend to get smaller yields.
How to grow weed — 10-Step Guide
Step 1: Pick The Place to Grow
Indoor Growing
The obvious advantage of growing indoors is that it is more private. But it also gives you more control over your grow. If you plan on growing just a few plants, growing indoors can be surprisingly cheap to get started and maintain. The challenge, however, is that your plants are 100% dependent on your care if they are to survive.
You can grow weed in a spare room, a closet, the garage, a grow tent, an extra bathroom or even the inside of a computer case! The main thing here is to consider the temperature and the fact that it will rise once you start growing. Young cannabis plants grow quickly when the temperature is a bit warmer, in the 70-85°F (20-30°C) range. In the budding/flowering stage, it’s best to keep it slightly cooler, around 65-80°F (18-26°C) to produce buds with the best color, trichome production, and smell.
To keep the temperature in the right range, you might have to install an air conditioner in addition to your exhaust system, especially if you want to install a lot of bright lights in a small space.
Here is my review of the best indoor grow kits for weed.
Outdoor Growing
Growing outdoors has one obvious benefit – its cheaper. The sun will be your grow light! Of course, you will have a less controlled environment and you will have to do a lot more work – if it’s dry, you will need to water your plants and if it’s too rainy, you need to protect your plants from getting overwatered.
A good rule of thumb about weed is if it’s too hot for you, it’s probably too hot for your plants. If you know it’s going to be extremely hot or cold where you live, you may need to take extra steps to protect your plants from the elements, like setting up a small greenhouse.
Step 2: Pick The Grow Light
If you’re growing outdoors, the sun will be your grow light. You might have to move your plants around if it gets too hot. But otherwise, it’s pretty straightforward.
If you’re growing indoors, here are some of the options you have:
Compact Fluorescent Light Bulbs (CFLs) & Household LEDs
Compact Fluorescent Light Bulbs (CFLs) & household LEDs your regular household lights and are the cheapest option. The downside is that they lack the power of dedicated grow lights. However, they can still get the job done.
Other Fluorescent Lighting (T5 / T8)
The T5 and T8 varieties are made for seedlings and plants that need lower light intensity than cannabis. I recommend changing to stronger grow lights for the flowering stage since these lights have a short light brightness range and must be kept very close to the tops of your plants.
LECs (Light Emitting Ceramic) grow lights
LECs (Light Emitting Ceramic) grow lights have a more natural color that makes it easier to care for and diagnose plant problems. They produce significant levels of UV light, which can possibly increase trichome production. Your plants will grow surprisingly fast under a LEC. I recommend the Philips Master 3100K:
LED grow lights
LED grow lights are powerful and work great for growing cannabis. Each LED model is different and needs to be kept a different distance away from your plants. It’s best to ask the manufacturer how far the lights should be kept, as that’s where new growers are most likely to mess up.
Metal Halide (MH) & High-Pressure Sodium (HPS)
MH/HPS grow lights are a type of High-intensity discharge (HID) lights that commercial growers use when growing cannabis indoors. They are incredibly powerful and surprisingly cheap. Higher wattage HID lights tend to run hot, but the smaller MH/HPS grow lights are great for a small grow and don’t produce nearly as much heat.
I have also reviewed the best grow lights for weed for you!
Step 3: Pick The Growing Medium
Different mediums have different care and watering requirements. Here are your options:
- Soil – growing in an organic composted super soil.
- Soilless Mix – anything besides soil, including coco coir, perlite, vermiculite, etc.
- Directly in Water/Hydroponics – This gives you the fastest growth and biggest yields possible, especially when combined with good grow lights.
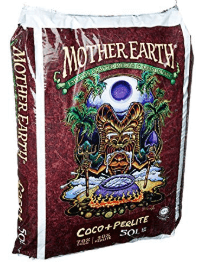
If you’re confused about this part, you can’t go wrong if you start with a mix of coco coir and perlite. Growing with coco coir is a good choice — it’s cheap, holds water well, and doesn’t have as many of the problems associated with soil.
If you’re keen on growing hydroponically, then go for it! Do your research before you get started, and nothing should stop you from getting an extraordinary harvest.
One of my go-to grow mediums is the Mother Earth Coco Plus Perlite Mix:
Step 4: Obtain The Right Nutrients
Growing in Soil
You will need cannabis nutrients made for soil unless you’re growing with composted super soil. Start adding nutrients once you reach the flowering/budding stage and your plants will have used up most of the nutrients in the soil by the time budding begins.
Growing soilless or hydroponics
You can purchase cannabis nutrients specifically made for hydroponics or soilless growing. Canna Coco is formulated to work best for growing weed in Coco Coir.

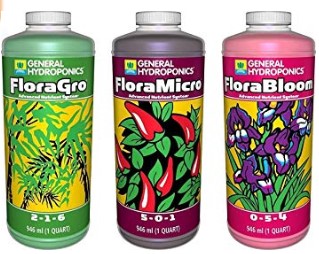
For hydroponic grow, I recommend the General Hydroponics Nutrient Trio:
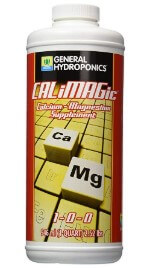
And the General Hydroponics CALiMAGic Quart Calcium and Magnesium blend:
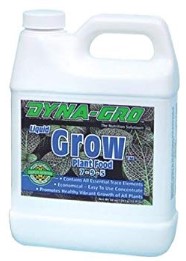
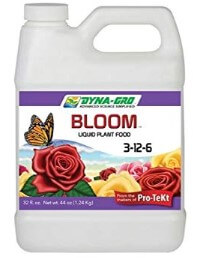
If you’re looking for nutrients that fit all mediums, you cannot go wrong with Dyna-Gro. There are two variants — ‘Grow’ is for the Vegetative stage and ‘Bloom’ is for the Flowering stage.
Dyna-Gro Grow:
Dyna-Gro Bloom:
A note on pH levels
Maintaining the pH of your root environment is critical. If the pH at the plant roots is too high or too low, your plants won’t be able to absorb nutrients properly. You have to test the pH of your water before you water your plants or add water to your reservoir. You can do this easily using “pH test kits”. I used the pH Perfect pH Test Kit:
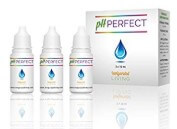
Checking and adjusting the pH and will take you less than 3 minutes each time you water your plants. For soil, you have to maintain the pH between 6.0 – 7.0 and for hydroponics, you have to maintain it between 5.5 – 6.5.
Step 5: Get The Cannabis Seeds (pick your strain)
You have two main options here: you can start with seeds or with clones. Clones are live female cannabis plants. If you’re a beginner, the best option may be to purchase cannabis seeds online from a breeder or seed bank. Here are some of the top seed banks you can buy from:
Seedsman
Located: U.K.
Ships: Worldwide
MSNL Seeds
Located: Seeds Sourced in Holland / Netherlands & Shipped out of UK
Ships: Worldwide
Amsterdam Marijuana Seeds (AMS)
Located: Amsterdam, Netherlands
Ships: Worldwide
Step 6: Germinate Your Seeds / Start Your Clones
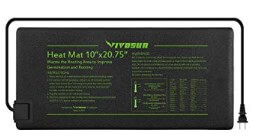
You can skip this step if you have rooted a live clone. However, if you’re working with seeds, you now germinate them. I prefer to germinate my cannabis seed using a specialized starter cube like a Rapid Rooter.

You have to keep the Rapid Rooters moist and warm. In addition, you can put your tray on a seedling heat mat.
Seedlings should pop in a few days to a week. Once the seedling has emerged, you can stick the cube directly into your growing medium or hydroponic system.
Step 7: Vegetative Stage – Only Stems and Leaves
The vegetative stage starts once your plants grow their first regular leaves. Weed plants get bigger with long days (vegetative stage) and start making buds when they get long nights (flowering stage). In this stage, keep your focus on making your plants big and strong. Buds and flowers are not going to show up yet.
Start feeding nutrients at half strength and then bring to 3/4 strength one plant starts thriving. Only feed nutrients at full strength if there are signs of nitrogen deficiency – lower leaves are turning lime green, then yellow, then falling off.
Give plants 18-24 hours/light a day when growing indoors. If growing outdoors, try to make sure your plant gets strong, direct light at least from 10 am-4 pm, and more if possible. The size your plant gets in this stage will have a huge impact on the final size of your plant.
Step 8: Flowering Stage – Buds Start Growing
Once your plants are getting at least 12 hours of uninterrupted darkness a night, they will start making buds. You are almost there! At this point, you will need to change to 12-12 light schedules, identify the gender of cannabis plants and get rid of any males.
If you’re growing indoors, you must change to a 12-12 light schedule, with 12 hours of light & 12 hours of uninterrupted darkness each. If you’re growing outdoors, your weed will start flowering a few months before winter when the days get short enough. It’s best to keep temps in the range of 65-80°F (18-26°C) to produce buds with the best color, trichome production, and smell.
This stage is where your plant reveals whether they are a boy or a girl. For most seeds, half your plants will end up female and half will end up male. This is one reason to start with clones or buy feminized seeds. Female plants are the only ones that make buds that can be used for smoking.
At this stage, female plants start growing wispy white hairs at the tops of branch joints – the pistils of her flowers/calyxes. You’ll get bunches of these calyxes growing on top of each other to make buds, and each calyx will have a few white hairs coming out of it. These are the buds that you will harvest eventually.
Step 9: Harvest Your Cannabis
Remember: wait until your buds stop growing new, white hairs. The whole grow room or area will likely smell strongly of cannabis and your buds will be fragrant, plump and ‘filled out’. The beginning of the harvest window is when at least 40% of the white hairs have changed color (darkened) and are curling in. Harvest when 50-70% of the hairs have darkened for the highest THC levels. Harvesting when 80-90% of the hairs have darkened will give you a couchlock, anti-anxiety effect.
To harvest, get a sturdy pair of scissors and cut the plant down. Next comes trimming.
Step 10: Dry & Cure Your Buds And Enjoy!
Having cut off and trimmed all of your buds, hang them upside down in a cool, dark place with plenty of ventilation so that they can dry out. Dry buds slowly for best results and check often for mold or overdrying.
Once they have dried, cure them by putting them in a tightly-closed quart-sized mason jar in a cool dark place. Fill each jar loosely about 3/4 of the way full. For the first 2 weeks of curing, open the jars once a day for several seconds to get fresh air in your jars and release any moisture. I prefer to cure it for at least a month. Keep your harvest in a cool, dry, airtight space for long-term storage.
In Conclusion: How to Grow Weed
So there you have it! You are all set to grow your own weed. Comment below with any questions or suggestions you might have.
Let’s all learn from each other and help each other. You might also want to check out some of our other cannabis-related articles: